Fish finders have become an essential tool for anglers, making it easier to locate fish and underwater structures. As an angler myself, I know the importance of understanding how to read a fish finder to maximize its effectiveness. In this article, we’ll explore the basics of reading a fish finder, helping you become more efficient in finding and catching fish.
I’ve spent countless hours on the water, learning how to interpret the data displayed on my fish finder. In my experience, it’s crucial to understand the different sonar frequencies used and how they affect the images on the screen. Echoes created when sound pulses bounce off underwater objects help to indicate the depth, size, and location of fish, as well as other underwater features, such as rocks, reefs, and shipwrecks.
As you become more proficient in reading a fish finder, you’ll be able to identify fish species based on their depth, size, and the underwater environment they inhabit. This valuable skill can greatly increase your chances of a successful fishing trip. In the following sections, we’ll cover the essentials of reading a fish finder, providing practical tips and examples to help you on your fishing adventures.
Understanding Fish Finder Terminology
Sonar Technology
When using a fish finder, it’s essential to understand the basic principles of sonar technology. Sonar stands for Sound Navigation and Ranging and is the primary tool utilized by fish finders to detect fish, and underwater structures and measure water depth. A fish finder sends out sound waves from its transducer, which then bounces off objects and returns to the device, creating a visual representation of the underwater environment on the display screen.
Transducers
The transducer is a crucial component of a fish finder, as it collects and sends out the sonar waves. Fish finders may have different types of transducers, each utilizing specific frequencies and beam angles. Some transducers are more suited for shallow water, and others for deep water applications. It’s important to choose an appropriate transducer for the intended usage to get accurate results.
Understanding the terminology related to transducers can be helpful. For example, cone angle refers to the width of the sonar beam, while frequency (measured in kilohertz, kHz) refers to the number of sound waves emitted per second. Generally, lower frequencies have wider cone angles and thus cover a larger area, while higher frequencies provide better detail in the sonar returns.
Display Screen Features
Various features on the display screen of a fish finder can help interpret the information provided by the sonar return. Some common elements include:
- Water depth: Most fish finders show the depth of the water in a numeric value.
- Underwater structures: Sonar returns display these as different shapes or lines on the screen depending on the structure.
- Fish arches/dots: Depending on the settings and type of fish finder, fish may appear as arches or dots on the screen. The size and shape of these representations can help determine the size and location of the fish.
- Bottom contour: By interpreting the sonar return, users can identify the contour and composition of the underwater terrain, such as slopes or drop-offs.
Overall, familiarizing oneself with these key fish finder terminologies is essential for successful fishing trips. Knowing how to interpret the display screen, understanding the functions of a transducer, and the principles of sonar technology will greatly improve the chances of finding and catching more fish.
Setting Up Your Fish Finder
Before I start fishing, it’s essential to set up my fish finder properly to maximize its effectiveness. This includes installation, optimizing settings, and calibration.
Installation
First, I choose the best location for my fish finder on my boat. I consider factors such as accessibility, visibility, and safety. Once I’ve found the perfect spot, I follow the manufacturer’s instructions to mount the display securely. Next, I install the transducer on the boat’s hull, making sure it’s fully submerged and angled correctly to provide optimal sound wave coverage. After mounting the transducer, I carefully route the cable to the display unit and make the necessary connections.
Optimizing Settings
After the installation is complete, I turn on my fish finder and navigate to the settings menu. Here, I can adjust various settings, like sensitivity, range, and frequency. To get the best results, I fine-tune these settings depending on the current fishing conditions:
- Sensitivity: I increase sensitivity in deeper waters to get better returns while decreasing it in shallow water to avoid clutter.
- Range: I match the range setting with the depth of the water I’m fishing in, ensuring that I’m not missing out on any important information from the bottom.
- Frequency: I choose a higher frequency for detailed imaging in shallower water and switch to a lower frequency to penetrate deeper water.
By optimizing these settings, I get the clearest view of the underwater environment and make it easier to spot fish and structures.
Calibration
Lastly, I calibrate my fish finder to ensure accurate depth readings and target separation. Some fish finders have a calibration process in their settings menu, while others might require manual adjustments. I always consult the user manual for my specific device to make sure I’m calibrating it correctly.
With proper installation, optimized settings, and meticulous calibration, my fish finder becomes a reliable tool that helps me locate fish and structure more efficiently.
Interpreting Screen Data
Identifying Fish
When I look at a fish finder screen, I often see arches or dots that usually represent fish. The size of the arch or dot signifies the size of the fish. If the creature swims through the entire sonar cone, it will show up as a complete arch on the screen, but if it’s only in a specific section, a half arc will appear. Half arches are often mistaken for smaller fish, but this isn’t always the case.
Reading Depth and Temperature
Another important aspect of the fish finder screen is the depth finder. This feature informs me about the depth of the water beneath my boat. Furthermore, many fish finders display the temperature of the water, which can be useful in predicting the activity and location of fish based on their preferred temperature range.
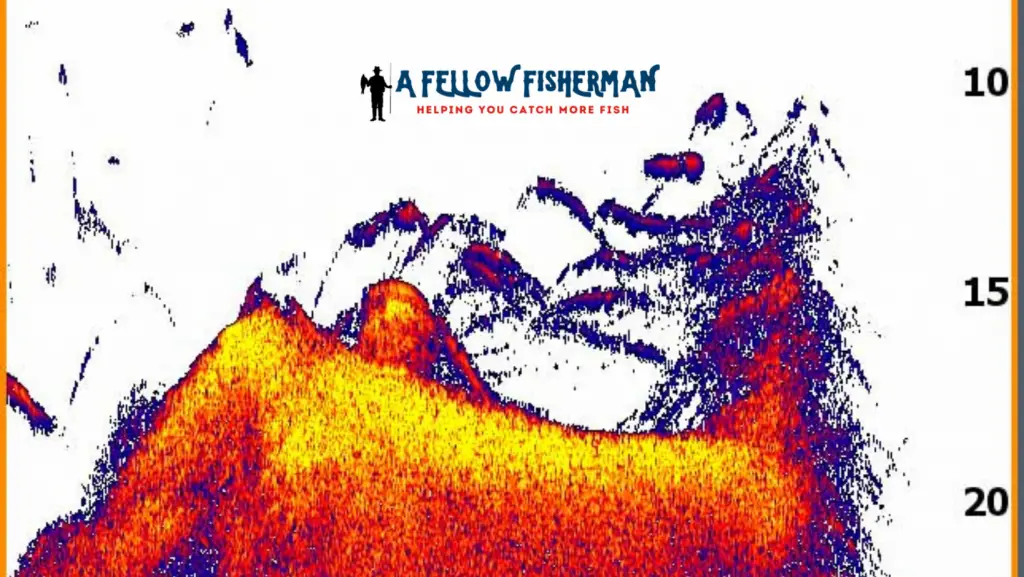
Recognizing Bottom Structure
The bottom contour displayed on the fish finder screen is also useful for understanding what is beneath the water’s surface. I can identify various underwater structures, such as drop-offs, sandbars, or rocky areas, based on the shape and color of the screen. Harder and denser objects often produce a darker color echo, while softer objects and vegetation might appear as lighter tones.
Distinguishing Bait Schools
In addition to individual fish, I can also identify schools of baitfish on the fish finder screen. These schools usually appear as dense, cloudy clusters and can often be surrounded by predator fish. Recognizing bait schools can improve my fishing experience by providing information on potential hot spots for larger fish looking for food.
Advanced Fish Finder Features
GPS and Mapping
One of the features I find most useful in a fish finder is its built-in GPS and mapping capability. They allow me to not only locate fish but also navigate my way through the waters and mark my favorite fishing spots. With GPS, I can drop pins on the map and easily return to these locations during future fishing trips.
Higher-end fish finder models even have touchscreen technology, which makes it much simpler for me to access and use the GPS and mapping functions while out on the water. This eliminates the need to fumble with buttons and dials during critical moments.
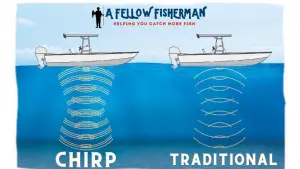
CHIRP Technology
Another advanced feature I’ve come across in modern fish finders is CHIRP technology. CHIRP, or Compressed High-Intensity Radar Pulse, the technology sends a range of frequencies into the water, as opposed to the single frequency used by traditional sonar. This results in more detailed and accurate information about the fish underwater.
With CHIRP technology, I can differentiate fish from other underwater structures more easily, and even identify the size and type of fish in the area. This additional information proves invaluable when targeting specific species and helps me save time on the water.
Side Imaging
Besides the traditional down imaging, fish finders with side imaging capabilities allow me to expand my search horizontally, giving me a broader view of the underwater terrain. This technology is particularly useful when scouting for structures, such as underwater logs or rock formations, which fish often use as hiding spots.
Using side imaging fish finders in conjunction with down imaging, I can create a comprehensive view of the underwater environment, increasing my chances of finding fish and making the most of my time on the water.
Click here to learn more about side imaging vs down imaging!
Tips for Successful Fishing with Fish Finders
Seasonal Fish Patterns
Being aware of seasonal fish patterns can greatly improve my fishing experience. Fish behavior changes throughout the year due to varying water temperatures and food availability, so it’s important to adjust our strategies accordingly.
During spring, fish move to shallower waters to spawn, making it an ideal time to target them using fish finders. In summer, fish tend to move to deeper, cooler waters, so utilizing the fish finder’s depth reading feature can help locate them with ease. Fall is a great time for fishing as fish move back to shallow waters to feed before the winter. Finally, winter fishing can be more challenging, but using fish finders can still help pinpoint fish in deeper, colder areas.
Matching Lures and Techniques
Matching the right lures and techniques to the specific conditions and species is crucial for a successful fishing experience. With the help of fish finders, I can better understand fish depth and location, allowing me to tailor my lure and technique choices.
For example, when targeting fish in shallow waters or near the surface, I might choose topwater lures, while deeper water situations may call for heavier jigs or deep-diving crankbaits. By pairing the appropriate lures and techniques with insights from fish finders, I can increase my chances of catching fish effectively and efficiently.
Enhancing Fish Finder Skills
Just like any other tool, fish finders require practice and continued learning to fully maximize their effectiveness. I always start by thoroughly reading the user manual and familiarizing myself with all the features and functions of my fish finder model.
Once I have a good understanding of the device, I like to practice using it in familiar fishing spots. This helps me understand how different fish species and submerged structures appear on the fish finder screen. Furthermore, I enjoy sharing my experiences with other anglers and learning from their techniques, as this can give me new ideas and insights for using fish finders most effectively.
Before you go, check out our list of reviews on the best fish finder by clicking here!